
















As the air turns crisp and the landscape transforms into a canvas of oranges and golds, fall offers a unique opportunity to bring nature-inspired creativity into the home. For parents looking to keep little hands busy while celebrating the season, tactile art projects are a fantastic solution. Shaving cream painting is a particular favorite for families because it balances the thrill of a “messy” activity with an incredibly simple cleanup process. By using shaving cream to create a marbleized paint medium, children can produce stunning autumn leaf art that captures the swirling colors of the season. These vibrant, textured leaves make beautiful wall decor or seasonal garlands.
Creative Fall Craft: DIY Marbled Paper Leaves Using Shaving Cream
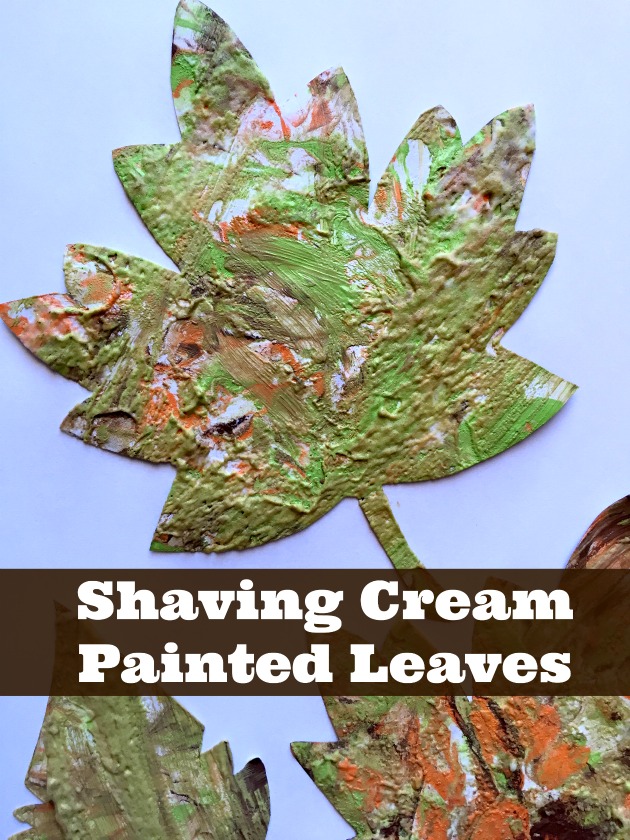
Engaging in a shaving cream paint project is a sensory-rich experience that appeals to both toddlers and older children. The fluffy, airy texture of the foam provides a soft medium for exploration, while the addition of color creates a mesmerizing marble effect. Beyond the visual appeal, this activity helps children develop fine motor skills and spatial awareness as they swirl patterns and press their designs. Because shaving cream is water-soluble, it is a low-stress way to encourage artistic expression without worrying about permanent stains on the kitchen counter.
Essential Materials for This Sensory Fall Activity
This project is wonderfully accessible, requiring only a few common household items. The novelty of using shaving cream as a “puffy paint” base makes it feel like a special event for kids, even though the preparation takes only minutes.

- White shaving cream (foam style, not gel)
- Leaf templates (printed from a computer, hand-drawn, or traced)
- Scissors
- Paint (washable tempera, finger paint, acrylics, or food coloring)
- A shallow pan, tray, or baking dish
Since this activity involves tactile play, setting up your workstation near a sink or keeping a pack of wet wipes nearby is helpful. While any paper works, using a heavier cardstock is often more effective because it holds up better against the moisture of the shaving cream without curling.
Step-by-Step Guide to Creating Shaving Cream Marble Paint
To begin, fill the bottom of your shallow pan with a layer of shaving cream. You do not need a deep reservoir; a thin, even layer is sufficient. Give the pan a gentle shake or use a spatula to smooth the surface into a flat canvas of foam.

Next, drizzle your chosen autumn colors across the top of the foam. You can use traditional fall shades like red, yellow, and orange, or experiment with deep purples and greens. Once the paint is added, use a spoon, a stick, or even fingers to gently swirl the colors. The key to a successful marble effect is to avoid over-mixing; you want to see distinct ribbons of color rather than a single solid hue.
How to Transfer the Marbled Pattern onto Paper Leaves
Prepare your leaf shapes by cutting them out from your paper or cardstock. You can find various templates online or take a nature walk to find real leaves to trace for a more authentic look.
Once your leaves are ready, place one flat onto the swirled shaving cream. Press down firmly and evenly across the entire surface of the paper to ensure the marbled pattern transfers to every corner of the leaf.

Carefully lift the leaf from the foam and lay it on a protected surface, such as old newspapers or a craft mat. After a few moments, use a straight edge or a paper towel to gently dab or scrape away the excess foam. The pigment will remain on the paper, revealing a beautiful, intricate marbled design. Allow the leaves to dry completely, which usually takes about an hour, before using them for decorating.
Final Thoughts on This Engaging Autumn Art Project

Shaving cream marble art is a rewarding way to celebrate the season because no two pieces are ever the same. The process is just as much fun as the final result, offering children a hands-on way to explore color theory and texture. Once the leaves are dry, they can be taped to windows, strung together as a festive mantel banner, or used as place cards for a fall dinner. This simple, budget-friendly craft is a wonderful tradition to start with your family, helping everyone slow down and enjoy the creative possibilities of autumn.